Canon 50mm f/1.8 Lens

Tuesday, January 19, 2010

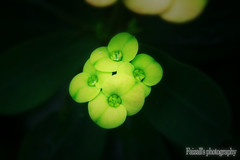
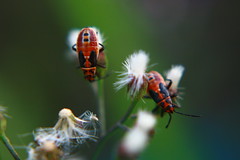
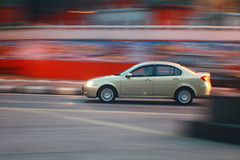
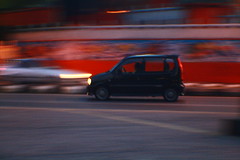
I recently brought my new fixed lens, a 50mm Canon portrait lens stoop until 1.8, make this lens very sharp and bright image produce. I also got no problems in taking night photos at 1.8 stop.

It only cost me about RM 330 (Copal Camera Shop, this time I try not to buy online). But this lens only came with lens caps (front and back). No hoods, no case and filter.

The photos? Very satisfy my portraits photography. the bokeh, the fokus and the sharpness is the best at 1.8.

But even it state 50mm lens, one of my friend told me that the 500mm is not the exact length. It must be time 1.5 due to something system called APC (I not sure the APC things but I will figure it out soon).

The photo from the lens? I will post It later to the blog. I quite busy as I start my study season as Chemical Engineer.

So try out the lens! It sure make you looks Pro!

Read more...

Cheapest Macro Style for Beginners

Wednesday, January 6, 2010

Macro or Micro?

It has different meaning, but just what I know

Macro = Very close up

Micro = thing like cells, atoms, germs, etc.

ok?

Sure some of beginner like to have their own Macro Photo right?
Almost everything is suitable for macro's subject. Just name it.
For beginner, to do some macro photography, you need to study the macro well.

"Hey, they only gives me Kit Lens. So how?"

In this case, I dont suggest you to but macro lens ( I guess you wont, it is far to expensive )
Due to that, I suggest you to buy "Macro Filter"


Depending on the diameter of your lens (basically, the Kit lens' diameter was 58mm), you can equip it to your lens (just like your UV lens)
It only cost you $30 (RM 100++) to obtain such macro photo.

"Wow! great! but, how does it work?"

Equip it to your lens, then focus it to the subject closely (I mean, VERY close) and you will see the filter actually work like magnifying glass.To focus it, you will not use the AF, switch it to Manual, and focus it by moving the camera forward or backward until you spot the right focus on subject. (very, I mean VERY tricky)

I recommend that:

1. Use flash, this will increase the speed of shutter and avoid "blur shake" effect.
2. Use tripod, for more stable position.
3. Use small aperture (f/11) for avoid too much DOF (depth of field)

Hey, I just spot some of the filter for kit lens at lelong.com.my!

HERE! (for kit lens)

the magnify power depending on the filter it self (+3,+6,+10)

And this is some macro photo that I made using my own macro filter :

Macro

Rope

dont trow it or economy down

on the smooth surface

and my fav one :

Love Bug


So? It is very good investment for you own photography! Try it and share it to the world.

Read more...

Panning. The Amatuer Guideline

Saturday, January 2, 2010

Sure you wondering, what else you can do with your new DSLR. Maybe some of the DSLR seniors already know everything about it (which mean DON'T CONTINUE reading this tips if you are PRO).

After you can control your Manual Mode well, try "Panning" photography (or effect..whatever^~^)

Panning is the idea where you point the focus to the subject (basically a moving object) and keep the other subject (the background) blur. This is can only be done with DSLR camera.

IMG_1059

Circular Panning

IMG_1072


This is some of panning photo example.


To shorten this blog's fill, follow this guideline to obtain such photo :

SETTING PART

1. Get the original reading of your f (aperture) and your shutter. This can be done as you set the camera in program mode.If you got high shutter speed here, make sure you turn the ISO to the lowest possible.

2. Set your mode to Aperture Priority. (for beginner, this mode is suggest). This mode give you automatic shutter speed setting, which you manipulate your aperture to get desire shutter speed.

3. Turn your aperture to small (example, f8 or f 10, depending on the light power source). Set the aperture to small and you must get the shutter speed around 1/13 second to 1/20, depending on the speed of the subject.

4.Set your shoot mode to continuous mode. This enable you to shoot 3 or 5 shoot per second (hold the shutter, and it depend on camera's ability)..

5. Turn your focus mode to manual (recommended for beginner)

SHOOTING PART

1. Get ready to focus the subject (example, a moving car) at the initial point (point where it start to move)

2. (VERY IMPORTANT PART) after focus it clearly, press and hold the shutter. From VIEWFINDER, FOLLOW THE MOVEMENT OF THE CAR with your camera. It other word, your camera need to follow the car while you shoot it. "Position yourself in a place where your view of the subject will not be obstructed by anyone or anything else. Also consider the background of your shot. While it will be blurred if there are distracting shapes or colors it could prove to be distracting. Single coloured or plain backgrounds tend to work best".

3. Then try it again if you get the result that is not very satisfy. Try different shutter speed (if it too clear, turn down and vice versa)

thats it! ^~^ good luck!

Read more...

WHAT is THIS EYE THING BLOG???

Blog of photography. Just want to show some of my photos taken by Canon EOS 400D. I'm a just a beginner in photography and take this field as a hobby. So the blog will more or less represent my photo gallery.

I will also post some of my reference books, tips and trick of DSLR camera, amateur guideline and introduction to real photography world.

I also try to help the beginner master the basic theory of photography.


  © The View of Mechanicals Eye Brownium by Ourblogtemplates.com 2009

Back to TOP